Approve Subnet Routes
In the previous page, you allowed devices under one account to access each other. This page continues with another common setup: letting Larktun-connected devices access devices inside an internal subnet.
This page uses 192.168.6.0/24 as the example. Assume you have a computer or Linux server already connected to Larktun, and that device can reach the 192.168.6.0/24 LAN. You will use it as a subnet router and publish that subnet into your Larktun network.
What Is a Subnet, and Why Advertise It
A subnet is a group of addresses inside the same private network. For example, 192.168.6.0/24 usually means the address range from 192.168.6.1 to 192.168.6.254. It may contain a NAS, printer, camera, industrial device, database server, or internal web admin page.
Not every device can run the Larktun client. Some NAS environments are limited, cameras and printers cannot install clients, and older servers may be hard to modify. In that case, one computer or Linux server inside the LAN can act as a "router node" as long as it has Larktun installed and can reach the subnet.
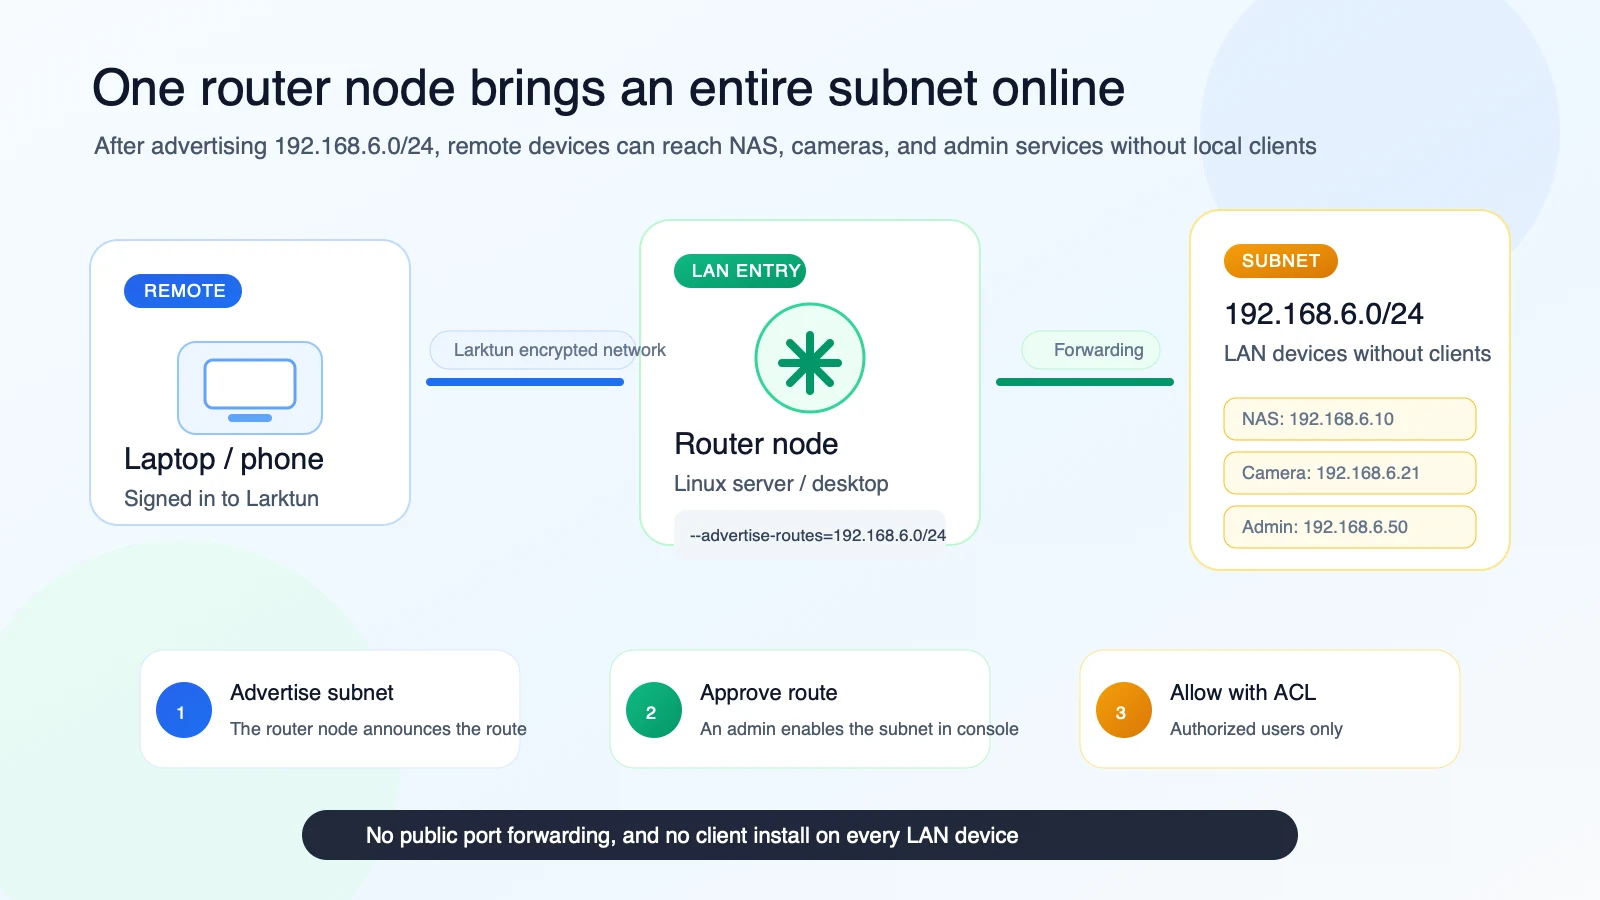
Advertising a subnet means this router node tells the Larktun control plane, "If someone wants to reach 192.168.6.0/24, send that traffic to me. I can forward it into the LAN."
The convenience is substantial: you do not need to install a client on every NAS, printer, or camera, and you do not need public router port forwarding. Approve one subnet route, control access with ACLs, and authorized devices can reach resources inside 192.168.6.0/24 almost like they are on the LAN.
Think of a subnet route as "one Larktun-connected device carrying an entire private network." It is useful for home NAS networks, office LANs, datacenter management networks, and industrial site networks.
Understand Route Approval First
A subnet route needs three things to work:
- Route advertisement: an online device tells the system, "I can forward traffic to
192.168.6.0/24." - Console approval: an admin approves that subnet in the
Routespage. - ACL allow rule: access control allows users or devices to reach
192.168.6.0/24.
If the route is advertised but not approved, it will not take effect. If the route is approved but ACL does not allow it, users may still be blocked.
Before You Start
- A computer or Linux server that is already signed in to the Larktun client.
- That device is inside
192.168.6.0/24, or can reach that subnet. - That device must stay online because other devices will use it to reach the subnet.
- For Linux servers, confirm IP forwarding is enabled.
On Linux, you can enable IPv4 forwarding temporarily:
sudo sysctl -w net.ipv4.ip_forward=1
To keep it after reboot, write it to system configuration:
echo 'net.ipv4.ip_forward=1' | sudo tee /etc/sysctl.d/99-larktun-subnet-router.conf
sudo sysctl --system
1. Advertise the Subnet on the Router Node
Run the command on the computer or Linux server that will act as the subnet router.
Use up to advertise the 192.168.6.0/24 subnet route and specify the Larktun login server:
sudo larktun up --advertise-routes=192.168.6.0/24 --login-server https://hs.larktun.com
If you already advertised other subnets, keep them and add the new one with commas:
sudo larktun up --advertise-routes=192.168.6.0/24,10.20.0.0/16 --login-server https://hs.larktun.com
After running the command, open the Larktun console and go to Routes. You should see 192.168.6.0/24 advertised by this device.
2. Approve the Route in the Console
Open Routes, find the device and the 192.168.6.0/24 subnet, then enable the switch on the right.
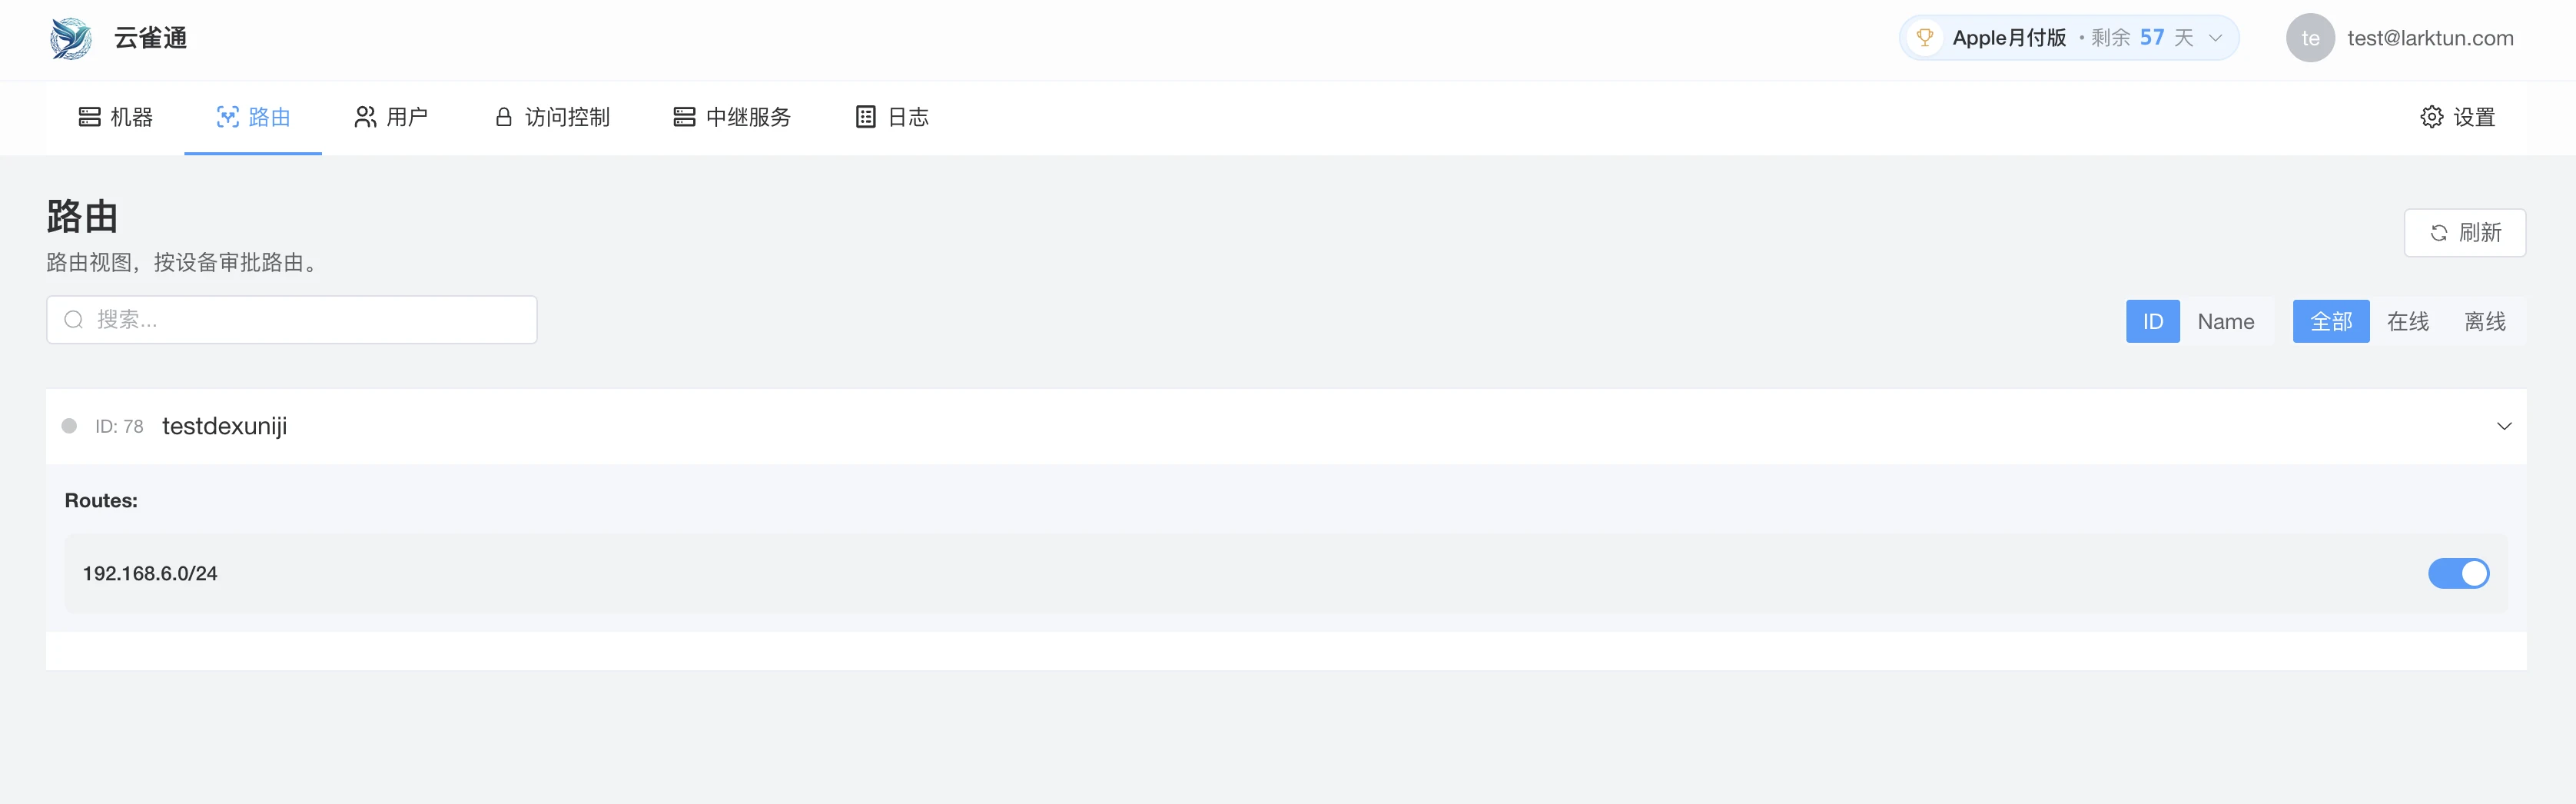
After approval, the route becomes available. If you no longer want to expose this subnet, return to this page and turn the switch off.
3. Allow Subnet Access in ACL
Route approval only tells the system that the subnet can be forwarded. ACL still decides who can reach it.
Open Access Control, switch to JSON Editor, and add a rule for 192.168.6.0/24. The example below keeps the previous device-to-device rule and adds a subnet access rule:
{
  "groups": {
    "group:test@larktun.com": ["test@larktun.com@"]
  },
  "tagOwners": {},
  "hosts": {},
  "acls": [
    {
      "action": "accept",
      "src": ["test@larktun.com@"],
      "dst": ["test@larktun.com@:*"]
    },
    {
      "action": "accept",
      "src": ["*"],
      "dst": ["192.168.6.0/24:*"]
    }
  ],
  "autoApprovers": {}
}
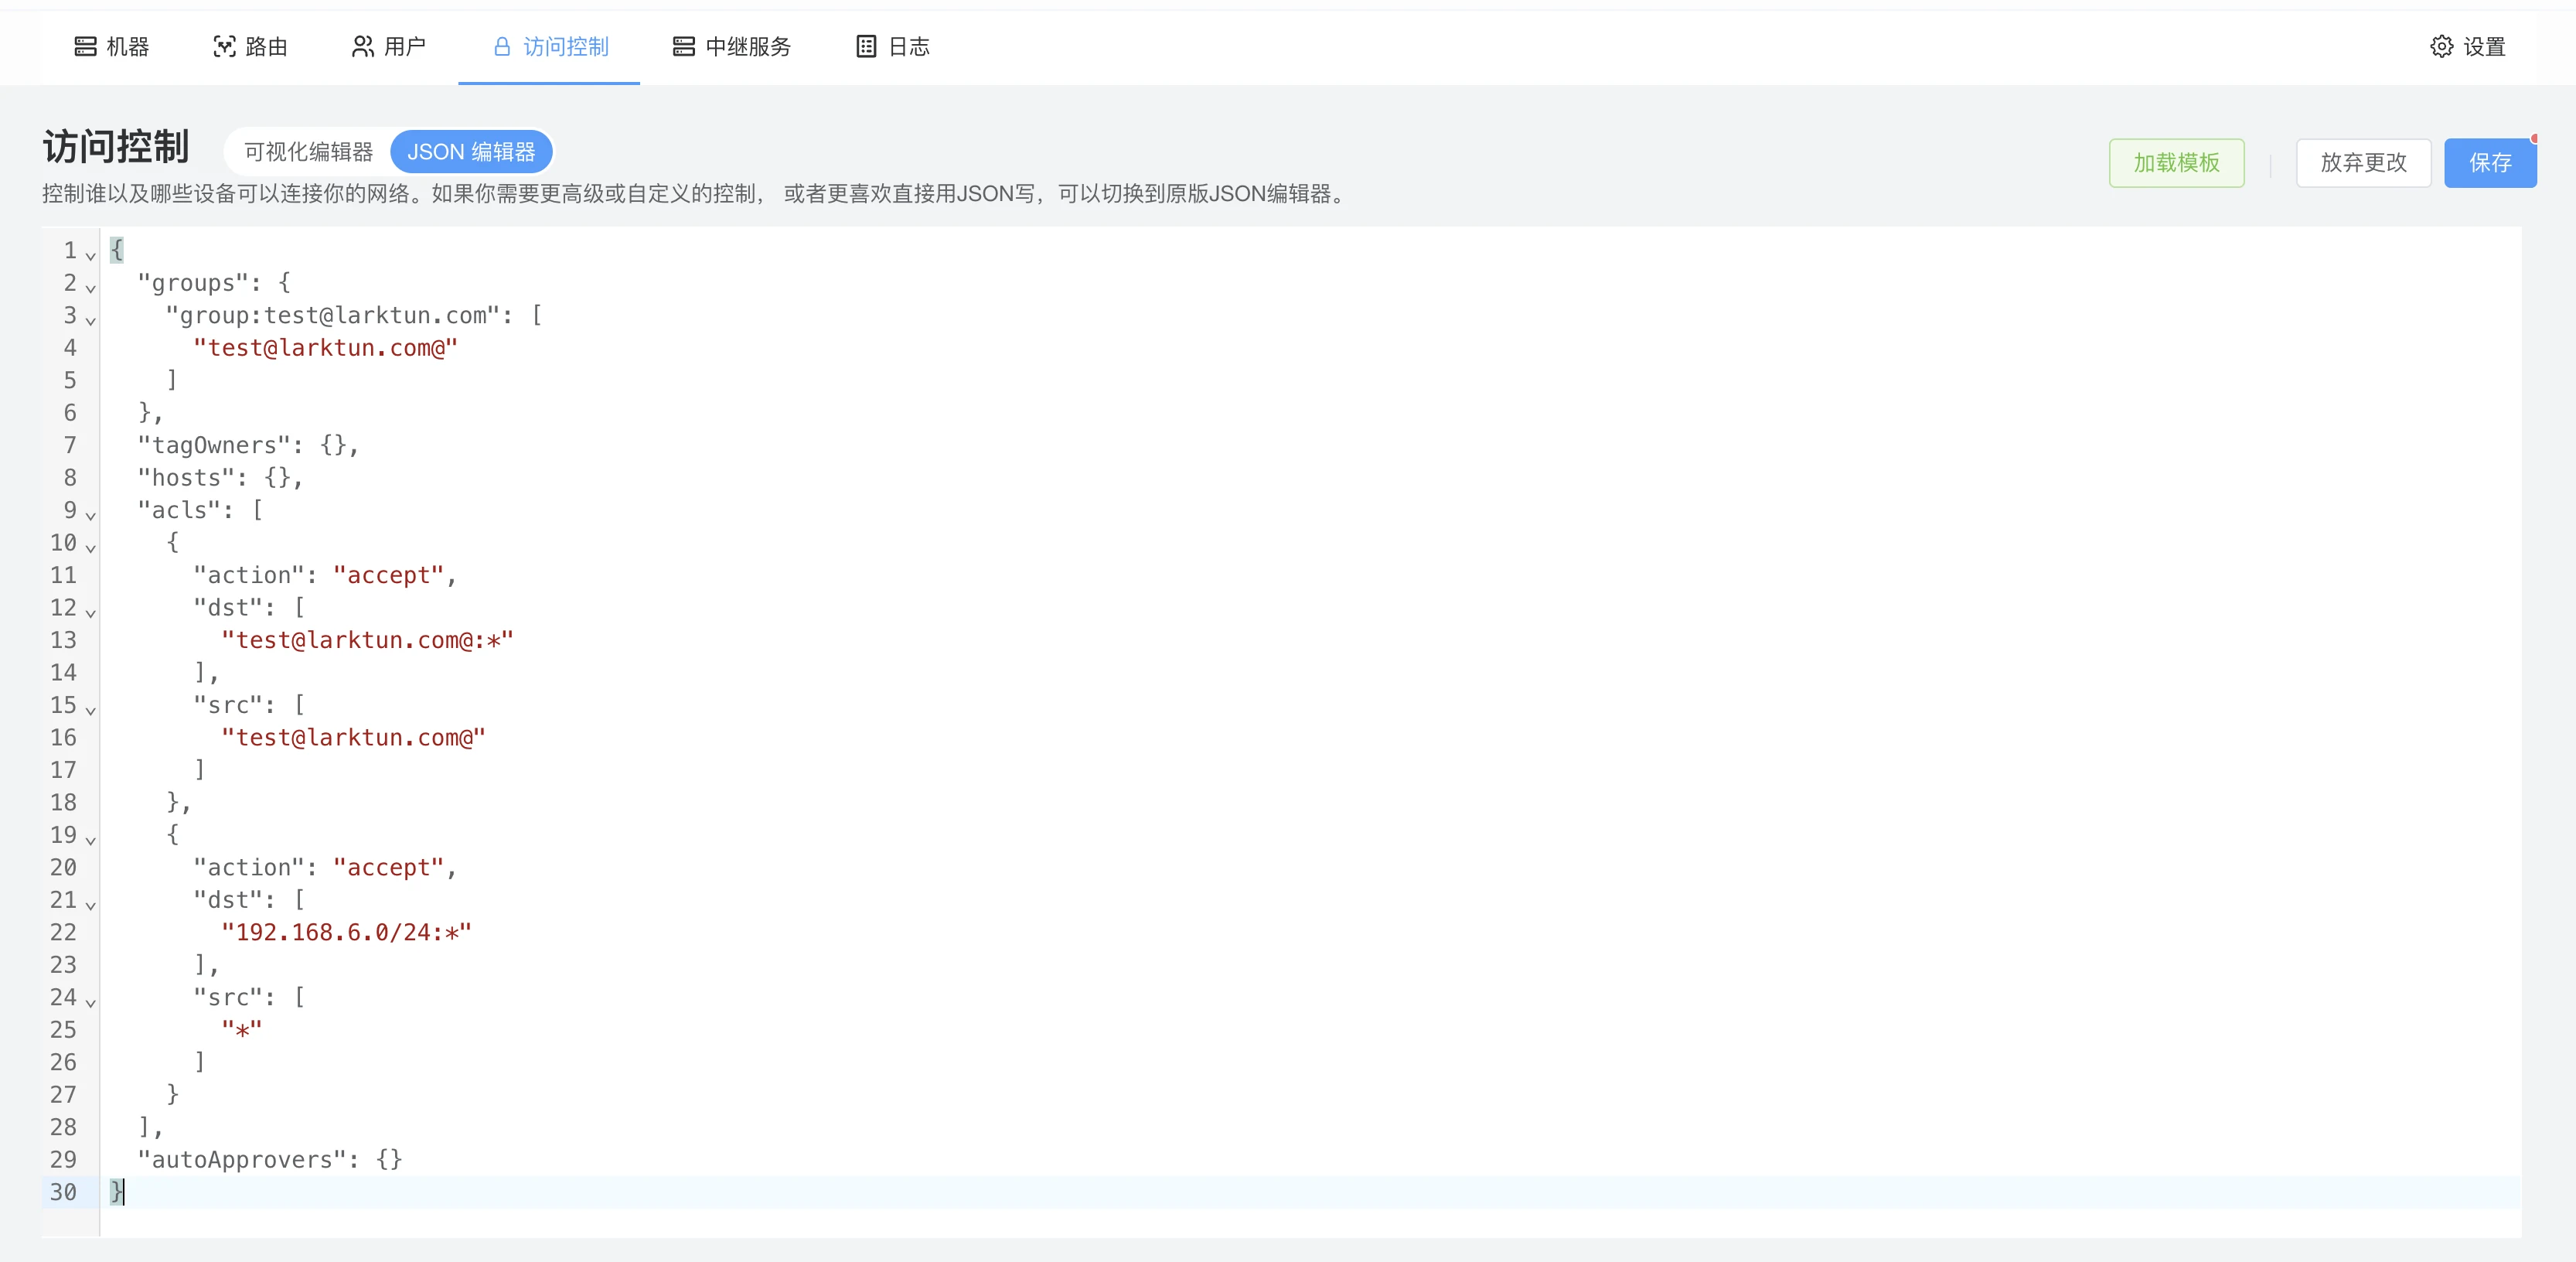
The second rule means: allow the source to access all ports in 192.168.6.0/24. The :* in 192.168.6.0/24:* means all ports on targets inside that subnet.
The screenshot uses * as the source for first-time validation. For long-term use, narrow the source to test@larktun.com@, a user group, or a specific device tag.
If you only want to allow one service, specify the port:
{
  "action": "accept",
  "src": ["test@larktun.com@"],
  "dst": ["192.168.6.0/24:443"]
}
This allows test@larktun.com to access only port 443 on devices inside that subnet.
4. Accept Routes on the Client and Test
The client that needs to access this subnet must also accept approved routes:
sudo larktun set --accept-routes
Then test a real device in the subnet from the client:
ping 192.168.6.10
curl http://192.168.6.10
ssh user@192.168.6.10
If the client can reach a service inside 192.168.6.0/24, route advertisement, route approval, and ACL allow rules are all working.
Quick Troubleshooting Hints
- The subnet does not appear in
Routes: confirm the router node is online and--advertise-routes=192.168.6.0/24succeeded. - The subnet appears but access fails: confirm the switch is enabled and the route is approved.
- The route is approved but traffic is still denied: check whether ACL includes
192.168.6.0/24:*or the exact port you need. - You can reach the router node but not other subnet devices: confirm the router node can reach the subnet, and check Linux IP forwarding or local firewall settings.
- One port fails: confirm the target service is running, local firewall allows it, and ACL port syntax is correct.
Next Step
- Revisit Create Your First Secure Access Path
- Read Routes Introduction
- Open Common Issues